In this entry we will write the first Wanted Seaside component.
Step 1: Create the Component
A Seaside Component is an object that responds to user actions, holds state relating to those actions, and renders itself as html. A component may be responsible for rendering an entire page or act as an embeddable piece of html that another component includes. Components that answer the canBeRoot class message with a true value are given special treatment: they show up as application entry point components in the Seaside config screen and can be mapped to a url--we'll use the config screen later.
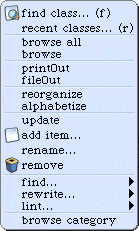
If you don't already have Squeak running with the wanted-tutorial.image we created in the last post, open it now. Right-click (Windows) or option-click (Mac) in the Packages pane (the first list view) in the Refactoring browser. You should see this menu:

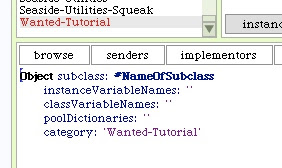
Choose "add item..." and enter "Wanted-Tutorial" in the dialog box that pops up. This will create the package that we will put all our Wanted source in. The Refactoring Browser should show our new package and should have changed the code pane to an object creation template:

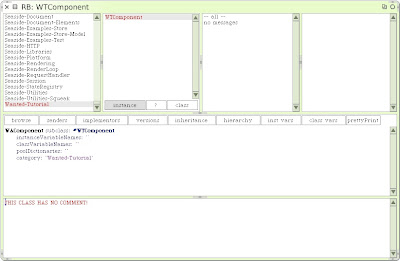
We want our object to be a Seaside component, so highlight the first word "Object" in the code pane by double-clicking it and change it to "WACom". Notice that the text you are typing is italicized and underlined. This is eCompletion doing a helpful service for you, searching out class objects that begin with the text you have entered. If you hit the tab key, eCompletion will display a matching list of two objects (WAComponent and WACompound) under your cursor. Make sure WAComponent is highlighted and press enter. Change "NameOfSubclass" to "WTComponent". This will be our ancestor that we will use for all of our Wanted components. Having a common ancestor allows us to reuse application-wide settings that we don't want to have to redefine in each component. Hit ctrl-s (Windows) or command-s (Mac) to save the object. Your Refactoring Browser should now look like this:

Step 2: Make the Component Available as an Application Root
Click on the class button in the Class pane (2nd list view) in the Refactoring Browser. Now click on "--all--" in the Message Category pane (3rd list view). The code pane now shows a default message template. Replace the text in the code pane with the following:
canBeRoot
    ^ true
What we've done is added a class-side message canBeRoot that returns a true value ("^" means return in Smalltalk). Save the message with a ctrl-s or command-s. Enter your initials in the dialog if you are prompted. Seaside will now know to treat this component as an application root entry point (we'll get to this in a bit).
Step 3: Have the Component Display Itself
Click the instance button, select the "--all--" message category, change the message template to the following:
renderContentOn: html
    html text: 'Seaside Rocks!'
and save. The renderContentOn: message asks the component to display itself using a WAHtmlRenderer object. WAHtmlRenderer knows about html. It acts like a stream that you can keep appending html attributes to in order to build a whole or part of an html page. For now, we are telling the renderer to emit a simple text string.
Step 4: Wire the Component up to a Seaside URL
Now, point your web browser to http://localhost:8080/seaside/config. You should see the Seaside config page:
At the top of the page you will see the current Seaside version displayed. Underneath that is a list of applications that have entry points into Seaside. Underneath the entry points is a Settings section. In the Path text field, enter "wanted", leave the Type as Application, and click the Add button.
You should be taken to the wanted Application config page:
Click on the Root Component drop down. This list contains all the Seaside components that answer the canBeRoot message with a true value. For now, we want our wanted entry point url to be handled by the WTComponent object we just created, so choose WTComponent from the list and click the Save button. The application config screen should refresh to reflect the change we just made. Click the Done button. You should be taken back to the Seaside config screen which now contains a wanted application entry point:
Click the wanted link and you should see the "Seaside Rocks!" text we entered in our component's renderConentOn: message.
Congratulations--you've just created your first working Seaside application! Google's not going to acquire your startup just yet, but it's a first step. Think about what we just did: In more or less four steps and less than 10 lines of code we created a simple web application without editing a single xml file and without reloading the server to deploy our component. The only time we left the Squeak environment was to configure our component as an application entry point using the Seaside config utility.
That's the end of this entry. Left click on the world and choose save to persist the changes to the wanted-tutorial.image file. Next time we'll create the Wanted model and some more sophisticated components to manage some CRUD operations on the model.
Required Reading
- The Seaside home page, of course! Read and re-read the documentation and tutorial pages.
- David Shaffer's Seaside Tutorial will help you when you get stuck.
- Ramon Leon's blog On Smalltalk is helping bring new developers (this one included) into the Squeak/Seaside fold.
- The Seaside mailing list.
- Seaside FAQ. I don't know if this is being actively maintained, but there is some good info there.


5 comments:
Excellent articles. I keep coming back to Squeak to try and learn Smalltalk and I keep getting hung up but these articles have been very informative and helpful!
-dustin
It's hard to balance family life, work, and learn all this new stuff, so it's nice to hear someone getting something out of them.
It seems like more people are starting to look at Seaside (and blog about it, too), so look around--help is all over the place. Good luck!
Hi, thanks for this nice tutorial. I'm having a bit of trouble, though. When I attempt to access the "Seaside config app", I am prompted for a username/password. Apparently you're supposed to specify this username/password when installing Seaside, but the used "squeak-web" image comes with Seaside already installed and seems to have a pre-configured username/password. I've tried both available versions of squeak-web (the version used in this post and the more recent version), with no luck. Do you happen to know the needed username/password, or how to reset it? Thanks.
Username should be "admin" and password should be "seaside". Have fun!
Quick response! Thanks mj. I actually discovered the username/password before seeing your response, though, when looking at http://seaside.st/Download/Images/. Thanks anyhow.
Post a Comment