Step 1: Refactor the WantedItem Class
At this point, our WantedItem is just a data holder. As Ramon Leon points out, having a constructor encapsulates how one should instantiate an object. Something else to notice is that the WantedItem class has an enteredDate, which is the date the WantedItem was created. We don't need to have the user assign this value--we know when a WantedItem object is created, so we can assign the value ourselves.
Select the WantedItem class in the Refactoring Browser, and click on the class button. Then select the "-- all --" message category so that the method creation template displays in the code pane. Enter the following code:
title: aTitle notes: someNotes
  ^ self new title: aTitle;
       notes: someNotes;
       enteredDate: DateAndTime now;
       yourself
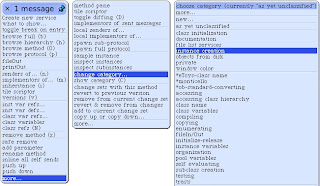
and save. We create a new WantedItem by passing it the new message, then set the fields on the new instance using the arguments the class message receives, then set the current date and time by passing the now message to the DateAndTime class. Notice that our new method went into a category named "as yet unclassified". Right-click or option-click the title:notes: selector in the message pane, select "more...", then "change category...". A large list of possible categories pops up. Choose "instance creation".

Now that we have a constructor that will create a new WantedItem with all the required fields, it's easier to create WantedItems and users of the class will have more confidence that they are creating an instance correctly.
One of the goals of this project is to figure out what items we really want based on how long we hold a desire for them. A WantedItem object instance already knows the date on which it was entered. If we provide the WantedItem class a with a time threshold, the instances can calculate whether or not they have passed the time test of being a true wanted item.
First we need to identify what the time threshold is. To do this, create a new instance side method on WantedItem called "daysToWait". Make sure the instance button is selected, then click on the "-- all --" message category and replace the code pane with the following:
daysToWait
  ^ 14
The daysToWait method returns the time threshold in days, which we have set to two weeks. The daysToWait method was put into the "as yet unclassified" category. Change the category to "defaults".
We then create a method called isPurchasable:
isPurchasable
  ^ (DateAndTime now - enteredDate) days >= self daysToWait
The isPurchasable method takes the current DateAndTime and subtracts the enteredDate DateAndTime from it. If you look at the "-" method in the DateAndTime class you will see that it returns a Duration object. Duration conveniently has a "days" method, which we use to compare against our daysToWait (14). If the item has been around the number of days to wait or longer, we can withdraw some money from the bank and get in trouble with the significant other. You'll be fine--just point them to the isPurchasable method.
Our WantedItem has grown a bit. Instead of just holding data, it now provides an obvious way for users to create it and knows whether it is a purchasable item or not.
Step 2: Create the HTML Table
On the main page of the Wanted app we want to display a list of wanted items: their titles, enteredDates and whether or not we can purchase them yet. Since we'll be displaying tabular data, it makes sense to use an html table. Seaside comes with a component that makes handling tables pretty easy: WATableReport. David Shaffer created a good tutorial on WATableReport based on some emails sent to the Seaside Mailing List from Radoslav Hodnicak and Dan Winkler. Basically you supply a WATableReport object with a collection of columns and a collection row data objects, and it will build the table for you.
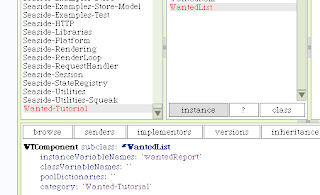
Click on the WantedList class and make sure the instance button is selected. Add an instance variable named "wantedReport" and save:

Then click on the "-- all --" message category and replace the code pane with the initialize method:
initialize
  | rows columns |
  super initialize.
  columns := OrderedCollection new
  add: (WAReportColumn selector: #title
                       title: 'Title');
  add: (WAReportColumn selector: #enteredDate
                       title: 'Entered Date');
  add: (WAReportColumn selector: #isPurchasable
                       title: 'Can Buy');
  yourself.
  rows := WantedDatabase wantedItems.
  wantedReport := WATableReport new rows: rows;
        columns: columns;
        yourself
and save. The first line is obviously the name of the initialize method. The second line contains two temp variables that exist for the life of the method--we introduce them to make it easier to work with the objects we will be using. Our WATableReport uses two collections to display data: a collection of WAReportColumns and a collection of row objects. The third line makes sure ancestors get initialized correctly. To create the columns, on the fourth line we create a new OrderedCollection by sending the OrderedCollection class the "new" message. Lines 5, 6, and 7 add WAReportColumns to that collection. Each WAReportColumn is constructed by sending the "selector:title:" class-side message. For selector, we pass a symbol (see this post for links to articles on Smalltalk syntax) representing the name of the message selector to call on each row data object. For title, we pass in the column heading that we want to display at the top of the table. Why is that "yourself" message there on line 8? We couldn't put a period directly after the last WAReportColumn because it would be returned by the parentheses and assigned to the columns temp variable. So we add a cascade operator after the last WAReportColumn, which will return the OrderedCollection, then send it the "yourself" message which just returns itself (you can't have the cascade operator as the last token). Line 9 assigns the WantedItems collection from our WantedDatabase to our rows temp variable. Lines 10 and 11 construct the WATableReport object using the columns and rows temp variables and assign it to the wantedReport instance variable. Line 11 returns yourself so that the columns temp variable is not assigned to the wantedReport intance variable.
Notice that when you saved the initialize method, it was assigned to the intialization category. When the WantedList component is created, the intialize method will automatically be called, building a WATableReport and assigning it to our wantedReport instance variable.
Since WATableReport is doing the heavy lifting to create the table html, our WantedList>>renderContentOn: method gets much smaller. Replace the renderContentOn: code with this:
renderContentOn: html
    html render: wantedReport
and save. The renderContentOn: method just asks the wantedReport to render itself (build the html table).
Since WATableReport is a descendent of WAComponent, we now have a subcomponent in our WantedList. Seaside expects components to tell it when they have child components through the children method. Add the following instance-side method to WantedList:
children
    ^ Array with: wantedReport
The children method gets assigned to the "children" message category.
Step 3: Test the Table
We are now finally at a point where we can switch back to the browser and see what we've got. Point your browser to http://localhost:8080/seaside/wanted and you should see something like this:
 So it's not the prettiest looking table in the world--we'll get to that in another post. Notice that the EnteredDate contains the date that we entered the item on, and that the "Can Buy" row value is "false". Let's test the isPurchasable method to see if it is working.
Flip back to the Refactoring Browser and open WantedItem>>daysToWait. Change the return value to 1. Since the comparison in isPurchasable is a greater than or equal test, this should pass all WantedItems. Save, then flip back to the browser and refresh. You should see "true" now for the "Can Buy" row value:
 Make sure to change the daysToWait method back to returning 14.
What happens when we try to display multiple items in the table? What happens if we click on the column headers (they are links)?
First, to test out how the table will look with multiple rows of data, let's create some more wanted items and add them to the WantedDatabase collection. We can use the new WantedItem constructor. Open a workspace and enter the following:
WantedDatabase wantedItems
add: (WantedItem title: 'Big Screen TV'
                 notes: 'Need this for the Wii');
add: (WantedItem title: 'Extra Wii Controller'
                 notes: 'For playing with a friend').
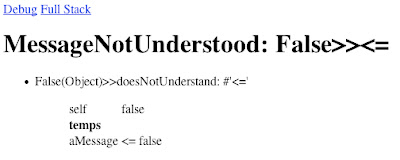
Then highlight and "do it". Flip back to the browser and refresh. You should now see three WantedItem rows. Note that if you click on the headings, the table will sort by that column value. WATableReport gives us that for free. Wait a minute--did you try clicking on the "Can Buy" header column? You should have seen this:

In order to sort the rows when we click the "Can Buy" header column, it looks like the <= comparison message is being used. When the isPurchasable method is called for each row data item, a Boolean value (False in this case) is returned. The Boolean object does not have the <= comparison message. Flip back to the WantedList>>initialize method. You can see that the WAReportColumn that is created for the "Can Buy" column is using the selector:title: constructor. This is what is causing our problem: the isPurchasable selector is returning a Boolean value. Fortunately, the WAReportColumn has another constructor: renderBlock:title:. For each data object in the rows collection, the renderBlock will be evaluated instead of calling a selector. Let's use this to return a String instead of a Boolean. Change the WAColumnReport constructor for the "Can Buy" column to this:
(WAReportColumn
    renderBlock: [:item | item isPurchasable asString]
    title: 'Can Buy');
When the renderBlock message is called, the row data object is passed into the block (we're calling it "item" here). We call the isPurchasable message off the item which will return a True or False Boolean object. We then send that Boolean object the asString message which will return either "true" or "false". Save the initialization method, flip back to the browser, and refresh. You should be able to sort all the columns now.
That's it for this entry--make sure to save the want-tutorial.image. We're getting closer to having a working application. The next post will focus on creating and editing WantedItems by using an editor component.
6 comments:
When you implement a constructor like #title:notes: you should use #yourself.
title: aTitle notes: someNotes
^ self new title: aTitle;
notes: someNotes;
enteredDate: DateAndTime now
becomes:
title: aTitle notes: someNotes
^ self new
title: aTitle;
notes: someNotes;
enteredDate: DateAndTime now;
yourself
This is to ensure that the object returned is the new instance and not what #enteredDate: may return. It usually works without #yourself because most of the time, setters return the receiver.
damien: Thank you--I updated the post.
For some reason I had to get a new session to get rid of the walkback, i.e., refresh alone didn't give me a new wantedList.
"Notice that when you saved the initialize method, it was assigned to the intialization category."
No, it wasn't. It was put in "as yet unclassified". Perhaps I've found a bug in the latest Seaside image?
"Save the initialization method, flip back to the browser, and refresh. You should be able to sort all the columns now."
Apparently, this isn't true. I had to create a new session in order to make it work.
MJ, thanks for putting up this tutorial; it's exactly what I need and I like your style of presentation.
Post a Comment